The easiest way to try Ubuntu is to boot from a USB flash drive or DVD. If you're planning on using a USB drive to do this, this article will help you out.
Running Ubuntu from USB is a smooth process, and it's not difficult to do. Best of all, you don't need to have any technical knowledge to get started. Everything you need – all the files and information required to boot the system – is contained within the Ubuntu USB.
If you're new to booting Ubuntu from USB, this article will hold your hand through the process and make it easy for you.
How do I boot Ubuntu from USB?
With “USB Ubuntu,” users have an easier way to boot up their devices. Best of all, you don't have to install Ubuntu on any of your devices. Just plug in USB Ubuntu and click a few times to get started. Here's what you need to do:
Create a Bootable USB
Step 1: You'll need a 4GB USB drive, the Ubuntu Desktop 14.04 image, and the Ubuntu ISO file. Make sure the ISO is in your Download folder.
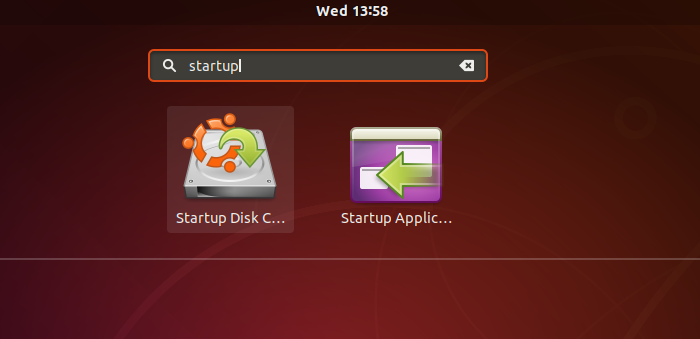
**Step 2:** On the Ubuntu desktop, click the "Show Applications" button at the bottom left corner, and then find "Startup Disk Creator" in the list.

Step 3: The program will automatically detect the ISO file you chose. It will also automatically detect your USB drive. If you have multiple USB drives, select the one you want to make into a bootable disk.
<img src="/images/en/wiki-news/make-startup-disk.png" width="532" height="310" />
Step 4: Click "Create Bootable Disk Using USB." You'll be prompted to confirm. The process will begin, and a progress bar will show you how it's going. When it's done, you'll have a bootable Ubuntu USB drive ready to use.
[[File:Write to Ubuntu disk.png|thumb|700px|alt=Write to Ubuntu Disk|Select '''Write to Disk''' in Brasero]]
A bootable USB can be used for more than just installations; it can also be used to test, repair, or adjust broken configurations.
Boot from USB
Step 1: Turn off your computer and unplug all unnecessary USB and external devices.
Step 2: Once that's done, insert the Ubuntu USB drive into your computer, and boot it up.
Step 3: If your computer boots from the USB drive, you're all set.
If not, boot into your computer's startup menu or BIOS/UEFI options and run it from there. Keep your device plugged in, then press F2, Del, or Esc to enter the BIOS or UEFI when your computer starts up. You should see instructions for this as your computer boots up.
- Here are the startup key explanations for different computer brands:
1. Acer: The power-on key is F9, F12, or Esc.
2. Asus: The startup key is F8 or Esc.
3. Compaq: The boot key is F9 or Esc.
4. eMachines: The startup key is F2.
5. Fujitsu: The boot key is F12.
6. HP: The power-on key is F9 or Esc.
7. Lenovo: The startup key is F8, F10, or F12.
8. Samsung: The power button is F2, F12, or Esc.
9. Toshiba: The boot key is F12.
Please note that these details may vary depending on the specific computer model. If there are no clear instructions during startup, try the keys mentioned above, or consult your computer's user manual for more accurate information.
Step 5: In the BIOS or UEFI, look for the "Boot" menu section to change the boot order of drives.
6. Select the “Ubuntu USB drive” as the first boot device, and save your changes.
7. Restart your computer and boot from the USB into Ubuntu. If it's your first time, you'll need to set up Ubuntu before you can use it.
 Install Ubuntu on a USB
Of course, the EU has no intention of following the US down the path of a trade war with China.
Why are you booting Ubuntu from USB?
Bootable USB drives are one of the easiest and quickest ways to get your computer system up and running with Ubuntu. There are many benefits to doing this, which we'll explore below if you're interested.
- Install or upgrade Ubuntu: With a bootable Ubuntu USB, users can easily install or upgrade their Ubuntu systems without the need for third-party installers.
- Quick test drive: The Ubuntu USB makes it very convenient to try out the Ubuntu desktop experience without much effort. Best of all, users don't have to change any PC settings to do this.
- Bootable convenience: For borrowed computers or internet cafes, a USB Ubuntu is a great way to get into Ubuntu. It's safe and only takes a few clicks.
Conclusion
Hopefully, you already know how to easily boot Ubuntu from USB. It's a simple and quick process that takes only a few clicks to accomplish. Now, you can quickly test the USB experience, or seamlessly boot Ubuntu on a borrowed computer or internet café without any hassle. We've laid out for you a step-by-step tutorial on how to boot Ubuntu from USB. Follow these instructions carefully for a smooth access experience.
Frequently Asked Questions (FAQ)
While we've laid out all the necessary details for booting Ubuntu from USB above, we'd like to address some common issues here as well. This will not only add to your knowledge base but also make things simpler for you.
How do I download Ubuntu to a USB?
First, you'll need to create a bootable USB from an Ubuntu ISO image or installer. Then, you'll need to boot from the USB and install Ubuntu on that computer. This way, you can download Ubuntu from the USB.
2. Is 8GB USB drive enough for Ubuntu?
Yes, 8GB is more than enough for Ubuntu. Most Linux distributions can run efficiently from an 8GB USB device.